This article describes how to build an offline Standalone Root Certificate Authority (CA) with an Enterprise Subordinate CA. You can configure it over Server Manager or with PowerShell. The article describes the way with PowerShell in Windows Server 2019 Server Core.
Go to Part 1 for configuring the Standalone CA: Install an Offline Root CA with an Enterprise Subordinate CA – Part 1
Part 2 – Implement Enterprise Subordinate CA
- Basic setup
- Installation of Windows Server 2019
- IP / DNS Configuration
- Change Computer Name
- Enable Remote Desktop
- Enable Firewall Rules (RDP, Remote Management,…)
- Join the server to your domain
- Install Active Directory Certificate Authority Role Service:
Add-WindowsFeature Adcs-Cert-Authority
If you want to configure more role services than just the CA you could use this command for all features:
Add-WindowsFeature AD-Certificate -IncludeAllSubFeature
Or you can run
Get-WindowsFeature
which returns you the available features around Certificate Services
- Configure Active Directory Certificate Authority:
Install-AdcsCertificationAuthority -CAType EnterpriseSubordinateCa -CACommonName Company-IssuingCA
- CAType should be EnterpriseSubordinateCa
- CACommonName ist the name of your Issuing CA
- There are additional parameters which can be set, the ones mentioned above are the most important, you can first execute the command with -WhatIf switch to check what will be happening
- After that command is executed and CA is installed, you will get a warning which is normal:
WARNING: The Active Directory Certificate Services installation is incomplete. To complete the installation, use the
request file “C:\servername.domain.ch_Company-IssuingCA.req” to obtain a certificate from the parent CA. Then,
use the Certification Authority snap-in to install the certificate. To complete this procedure, right-click the node
with the name of the CA, and then click Install CA Certificate. The operation completed successfully. 0x0 (WIN32: 0) - Copy the generated Certificate request file to your Root CA Server
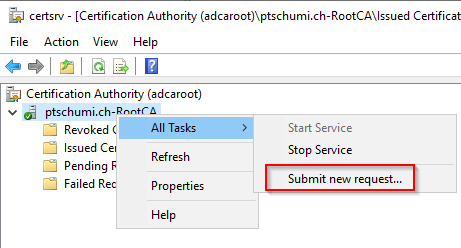
- On the Root CA Server Submit a new Certificate Request
- Select the certificate request file and complete the wizard
- The certificate will now show up in the Pending Requests section (it may take some seconds, refresh)
- Right click on the certificate and click all Tasks > Issue
- The certificate is now under Issued Certificates
- Double click on the issued certificate, navigate to details and click Copy to File…
- Select PKCS #7 type, including all certificates in the certification path and save the file under C:\Windows\System32\certsrv\CertEnroll\Company-IssuingCA.p7b
- Copy the three files (crl and 2x crt) from Root CA Server (C:\Windows\System32\certsrv\CertEnroll) to Subordinate CA Server (e.g. C:\inetpub\wwwroot\CertEnroll)
- Verify the CRL is accessible through the URL you defined in Part 1 (http://crl.domain.ch/CertEnroll/<CaName><CRLNameSuffix><DeltaCRLAllowed>.crl)
- Execute the following commands to Publish the Certificate and CRL to AD
certutil -dspublish -f C:\inetpub\wwwroot\CertEnroll\RootCAServer_Company-RootCA.crt RootCA
certutil -dspublish -f C:\inetpub\wwwroot\CertEnroll\Company-RootCA.crl
- Execute the following command to install the Subordinate CA Certificate
certutil -installCert C:\inetpub\wwwroot\CertEnroll\Comany-IssuingCA.p7b
- Now you should be able to start the the Issuing CA service
- Now you can Shutdown the Offline Standalone Root CA
- Next possible steps to take:
- Distribute the Issuing CA Certificate through GPO (Default domain policy > Computer Configuration >Policies > Windows Settings > Security Settings > Public Key Policies > Intermediate Certification Authorities > Import > Select Certificate from Subordinate CA
- Create certificate templates
- Install additional components like Online Responder, Web Enrollment,…
- …