This article series describes the different parts necessary to create an Always On VPN User tunnel based on Enterprise PKI certificates distributed through Intune with a SCEP Certificate Profile.
Prerequisites
- Deploy an Offline Root CA
- Deploy an Enterprise Subordinate CA
- Deploy an Network Device Enrollment Service (NDES) with Intune Connector
- Deploy Routing and Remote Access Server as an Always On VPN Server
- Deploy NPS Server to Support EAP (PEAP / Smart Card or other certificate)
This series covers
- Create the User Authentication Certificate Template for Always On VPN
- Distribute the User Authentication Certificate for Always On VPN with Intune SCEP Certificate Profile
- Create the EAP VPN Connection
- Create the Intune VPN Profile
Create the EAP VPN Connection
Time needed: 20 minutes
- Add a new VPN Connection
Add-VpnConnection -Name "ptschumiAOVPN" -ServerAddress "aovpn.ptschumi.ch" -TunnelType "IKEv2" -EncryptionLevel "Maximum" -AuthenticationMethod Eap -Force -PassThru
- Go To Control Panel > Network and Internet > Network Connections
Open the properties of the VPN connection created in step 1.
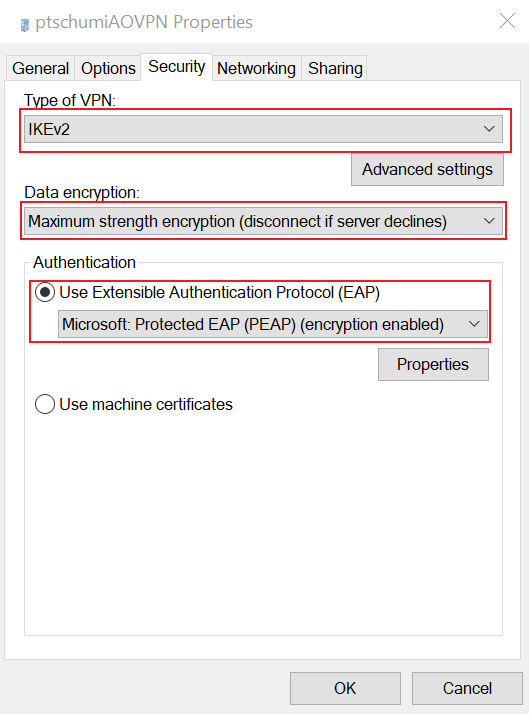
- Select the security tab and set Authentication to PEAP
Here the type should already be IKEv2, also Data encryption should be Maximum strength encryption.
At authentication you need to select: Microsoft: Protected EAP (PEAP) (encryption enabled)
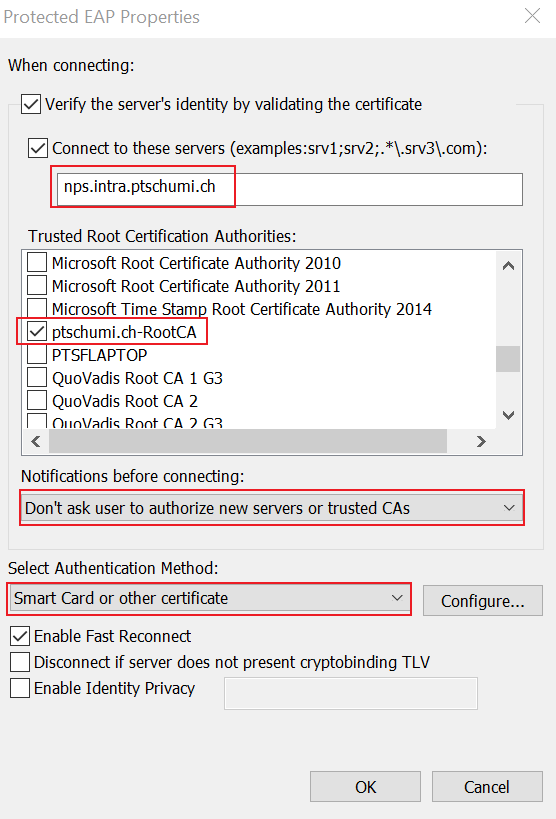
- Click properties below Authentication
The Server name in the text box below Connect to these servers must match the internal FQDN of your NPS server (you can verify that in the NPS console on the Network Policies, VPN Connections, EAP Types, PEAP > Edit).
Choose your Root Certificate deployed before from the Trusted Root Certificate Authorities.
Make sure the other settings are set as shown below.
- Configure the Authentication Method
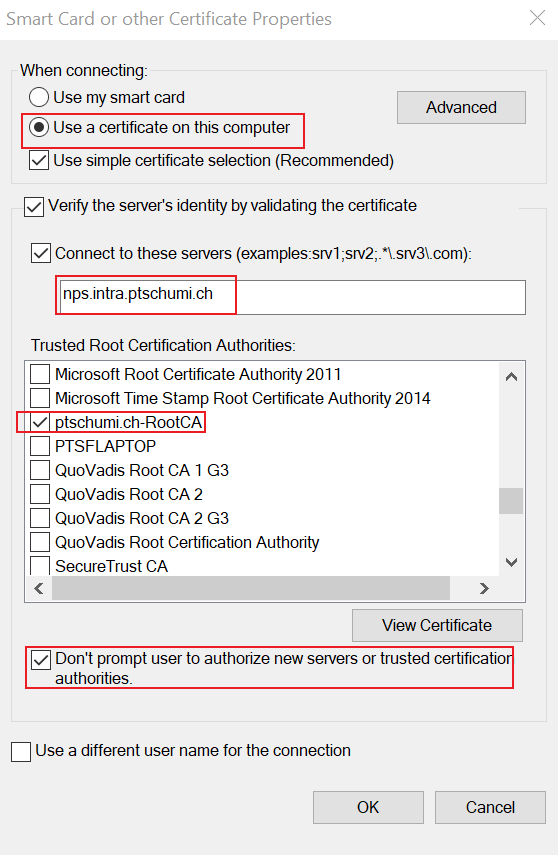
On the screen above click Configure for Smart Card or other certificate, another similar window opens.
Here you need to select Use a certificate on this computer and again enter the FQDN of your NPS into the text box.
Also you have to select the Root Certificate again.
Last you have to select Don’t prompt user…
Make sure the other settings are set as shown below.
- Confirm and close all windows with OK and close the adapter settings
- Connect your VPN
Before you continue, test your VPN connection from external, if it connects fine you can continue, otherwise you need to troubleshoot. Any errors are also logged in the Application Event Log with the Source RasClient.
To troubleshoot certificate related errors, I suggest you to enable the CAPI2 Log within the Application and Services Logs > Microsoft > Windows > CAPI2. - Export EAP Configuration
Now as we have the configuration, for Intune we need the EAP Host Configuration Information to be exported.
This you can achieve the following way:
$vpn =Get-VPNConnection -Name VPNConnectionName
$vpn.EapConfigXmlStream.InnerXml | Out-File C:\eap\AOVPN.xml
EAP Host XML Example Config File for direct use
If you’re on the fast lane and don’t want to configure a VPN connection to export the EAP XML File for Intune, you can copy below code and you just need to replace the NPS server values and TrustedRootCA thumbprints.
<EapHostConfig xmlns="http://www.microsoft.com/provisioning/EapHostConfig">
<EapMethod>
	<Type xmlns="http://www.microsoft.com/provisioning/EapCommon">25</Type>
	<VendorId xmlns="http://www.microsoft.com/provisioning/EapCommon">0</VendorId>
	<VendorType xmlns="http://www.microsoft.com/provisioning/EapCommon">0</VendorType>
	<AuthorId xmlns="http://www.microsoft.com/provisioning/EapCommon">0</AuthorId>
</EapMethod>
<Config xmlns="http://www.microsoft.com/provisioning/EapHostConfig">
	<Eap xmlns="http://www.microsoft.com/provisioning/BaseEapConnectionPropertiesV1">
		<Type>25</Type>
		<EapType xmlns="http://www.microsoft.com/provisioning/MsPeapConnectionPropertiesV1">
			<ServerValidation>
				<DisableUserPromptForServerValidation>true</DisableUserPromptForServerValidation>
				<ServerNames>nps.intra.yourdomain.ch</ServerNames>
				<TrustedRootCA>fc ce b4 db 60 1b e9 7b 86 1f 36 a9 06 11 15 3a bc 47 3b ad </TrustedRootCA>
			</ServerValidation>
			<FastReconnect>true</FastReconnect>
			<InnerEapOptional>false</InnerEapOptional>
			<Eap xmlns="http://www.microsoft.com/provisioning/BaseEapConnectionPropertiesV1">
				<Type>13</Type>
				<EapType xmlns="http://www.microsoft.com/provisioning/EapTlsConnectionPropertiesV1">
					<CredentialsSource>
						<CertificateStore>
							<SimpleCertSelection>true</SimpleCertSelection>
						</CertificateStore>
					</CredentialsSource>
					<ServerValidation>
						<DisableUserPromptForServerValidation>true</DisableUserPromptForServerValidation>
						<ServerNames>nps.intra.yourdomain.ch</ServerNames>
						<TrustedRootCA>fc ce b4 db 60 1b e9 7b 86 1f 36 a9 06 11 15 3a bc 47 3b ad </TrustedRootCA>
					</ServerValidation>
					<DifferentUsername>false</DifferentUsername>
					<PerformServerValidation xmlns="http://www.microsoft.com/provisioning/EapTlsConnectionPropertiesV2">true</PerformServerValidation>
					<AcceptServerName xmlns="http://www.microsoft.com/provisioning/EapTlsConnectionPropertiesV2">true</AcceptServerName>
				</EapType>
			</Eap>
			<EnableQuarantineChecks>false</EnableQuarantineChecks>
			<RequireCryptoBinding>false</RequireCryptoBinding>
			<PeapExtensions>
				<PerformServerValidation xmlns="http://www.microsoft.com/provisioning/MsPeapConnectionPropertiesV2">true</PerformServerValidation>
				<AcceptServerName xmlns="http://www.microsoft.com/provisioning/MsPeapConnectionPropertiesV2">true</AcceptServerName>
			</PeapExtensions>
		</EapType>
	</Eap>
</Config>
</EapHostConfig>


